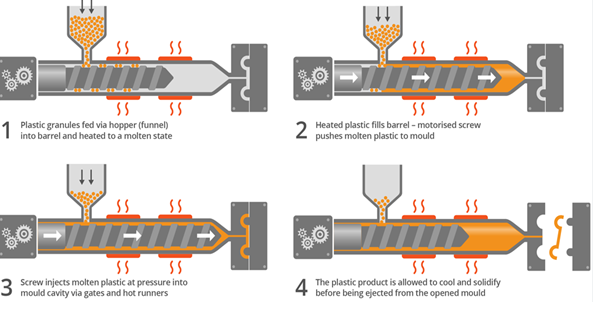
The four stages of injection molding are clamping, injection, cooling, and ejection, which together form the manufacturing process.
Stage 1: Clamping
Understanding the Clamping Mechanism
The clamping mechanism in injection moulding is the first critical step in the moulding process:
Function: It involves closing and securing the two halves of the mould.
Types of Clamping Systems: Hydraulic, mechanical, or a combination of both. Hydraulic clamps are common, known for their strong force and durability.
Operation: The mechanism operates either manually or automatically, with the machine’s controller setting the appropriate clamping force.
Importance of Clamping Force in Injection Moulding
Clamping force plays a pivotal role in the quality of the final product:
Calculation of Clamping Force: Determined based on the projected area of the part and the pressure within the mould.
Implications: Insufficient clamping force can lead to mould flash, while excessive force may damage the mould.
Efficiency and Cost: Proper clamping force ensures efficient use of energy and minimizes wear on the mould, impacting the overall cost of operation.
For more information on the clamping process, refer to the Wikipedia page on Injection Moulding.
Stage 2: Injection
The Process of Injecting the Molten Material
- Melting Process: Plastic pellets are heated to a specific temperature, usually between 200°C and 300°C, to reach a molten state.
- Injection into the Mould: The molten plastic is then injected into the mould cavity under high pressure, often ranging from 1000 to 15000 psi.
- Controlled Speed: The injection speed is crucial. An optimal speed ensures complete cavity filling without causing material degradation or defects.
This phase requires precise control to ensure the quality of the molded part.
Factors Affecting the Injection Phase
- Material Properties: Materials with different viscosities will require adjustments in injection pressure and speed.
- Mould Design: Complex mould designs might necessitate varied injection parameters to fill intricate geometries adequately.
- Machine Capabilities: The injection unit must have the capacity to deliver the right amount of material at the correct pressure and speed.
Optimizing these factors is essential to achieve a defect-free injection process and high-quality output.
For more information, the Wikipedia page on Injection Moulding provides an extensive overview of the process.

Stage 3: Cooling
Cooling Mechanisms in Injection Moulding
Cooling Systems: Most moulds use water or oil-based cooling systems. These systems circulate the coolant through channels within the mould to extract heat from the molten plastic.
Duration: Cooling time can range from a few seconds to several minutes, depending on the thickness of the part and the type of plastic used.
Uniformity: Achieving uniform cooling is critical. Uneven cooling can lead to warping or internal stresses in the final product.
Proper cooling is essential to ensure the part retains its shape and dimensions as it solidifies.
Impact of Cooling on Product Quality
Dimensional Accuracy: Uniform cooling ensures the part shrinks evenly, maintaining dimensional accuracy.
Surface Finish: Rapid or uneven cooling can lead to surface defects like sink marks or surface delamination.
Cycle Time: Efficient cooling reduces the overall cycle time, enhancing productivity. However, overly rapid cooling can compromise part quality.
Balancing the cooling rate is vital for producing high-quality parts and optimizing the production cycle.
For more comprehensive information on cooling in injection moulding, consider exploring the Wikipedia page on Injection Moulding.
Stage 4: Ejection
Ejecting the Final Product from the Mould
Ejection is the final stage in the injection moulding process:
Mechanism: Once the part has cooled and solidified, ejector pins push it out of the mould.
Timing: The ejection occurs after sufficient cooling to ensure the part maintains its shape. This timing is crucial and varies depending on the material and part thickness.
Force: Ejection force must be balanced. Excessive force can damage the part or the mould, while insufficient force can lead to the part sticking in the mould.
Proper ejection is vital to maintain the quality and integrity of the moulded part.
Techniques to Ensure Smooth Ejection

Several techniques can enhance the ejection process:
Mould Release Agents: Used to facilitate easier ejection and prevent sticking.
Surface Finish of the Mould: A smoother mould surface can reduce resistance during ejection.
Ejector Pin Design and Placement: Strategic placement and design of ejector pins can ensure even force distribution.
For more details on the ejection stage, the Wikipedia page on Injection Moulding offers additional insights.
Optimizing the Four Stages
Optimization of the four stages in injection moulding is crucial for achieving efficiency and high-quality products.
| Stage | Optimization Techniques | Impact on Process Efficiency |
|---|---|---|
| Clamping | Adjusting clamping force to match part size and material, Regular maintenance of clamping mechanism. | Reduces chances of defects like flashing, improves mould life. |
| Injection | Fine-tuning injection speed and pressure based on material viscosity, Using advanced sensors for precise control of material flow. | Enhances part quality, reduces material wastage. |
| Cooling | Optimizing cooling time based on part thickness, Implementing uniform cooling channels in the mould design. | Improves cycle time, ensures dimensional accuracy and surface finish. |
| Ejection | Using appropriate ejection force,Applying mould release agents and optimizing ejector pin placement. | Prevents damage to the part, ensures smooth operation. |
For an in-depth understanding of each stage and its optimization, explore the Wikipedia page on Injection Molding.