To reduce shrinkage in plastic injection molding, optimize material selection, adjust processing parameters, and ensure uniform cooling.
Understanding Shrinkage in Injection Molding
Shrinkage is a phenomenon commonly associated with the injection molding process, particularly when dealing with thermoplastic materials. As the molten plastic cools and solidifies inside the mold, it contracts, leading to variations in part dimensions. Properly managing this shrinkage is vital to produce parts with the desired quality and specifications.
Definition of Shrinkage
Shrinkage, in the context of injection molding, refers to the percentage reduction in size of a molded part as it cools from its molten state to a solidified form. It is typically expressed as a percentage and can be calculated as:
Shrinkage (%) = (Size of the molded part when molten - Size of the part when solidified) / Size of the part when molten * 100
For example, if a part measures 101 mm when molten and 100 mm when solidified, the shrinkage would be 1%.
Causes of Shrinkage in Molding Processes
- Material Properties: Different plastic materials exhibit varying degrees of shrinkage. For instance, a material like Polystyrene might have a shrinkage rate of 0.2% to 0.6%, while Polyethylene can range from 1% to 2.5%. These variations arise from differences in molecular structure and composition.
- Molding Parameters: The molding process’s specific parameters, such as injection speed, hold time, and temperature, can influence the degree of shrinkage. For instance, a faster injection speed might reduce shrinkage by filling the mold more efficiently, but if it’s too fast, it might lead to other defects.
- Mold Temperature: The temperature of the mold can have a significant effect on shrinkage. A mold temperature of 60°C might result in a different shrinkage rate than a mold at 80°C.
- Cooling Rate: The rate at which the molded part cools can play a crucial role. Faster cooling might lead to higher shrinkage, but if cooling is too rapid, it can introduce stresses or warping in the part.
- Part Design: Complex designs with varying wall thicknesses can lead to differential shrinkage. A part with a wall thickness of 2 mm might experience different shrinkage compared to a section that’s 4 mm thick.
Factors Affecting Shrinkage
Understanding the factors influencing shrinkage in the injection molding process is paramount to optimizing part quality and production efficiency. Let’s delve into the major factors and see how they play a role in the final product’s dimensional stability.
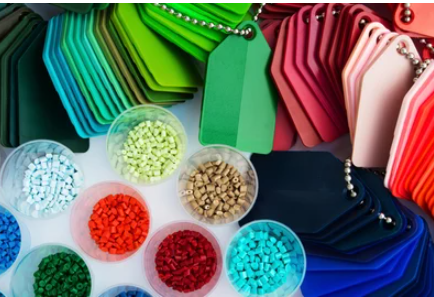
Material Selection and its Characteristics
Different plastic materials exhibit varied shrinkage rates. This is mainly due to their unique molecular structures and inherent characteristics.
- Polystyrene (PS): Typically exhibits a shrinkage rate of 0.2% to 0.6%. Its low cost makes it a popular choice, but manufacturers should be wary of its shrinkage rate.
- Polyethylene (PE): A common material that can show shrinkage rates between 1% and 2.5%. Its versatility in applications is commendable, but the considerable variation in shrinkage means careful attention to molding conditions.
- Polypropylene (PP): This material, known for its flexibility, can have shrinkage rates of 1.5% to 2.5%. While it’s great for a variety of applications, this range suggests that parameters need to be meticulously set to achieve desired results.
Mold Design and Geometry
The design of the mold and its geometry directly impacts how a material will shrink.
- Wall Thickness: Parts with a uniform wall thickness of 3 mm might shrink uniformly, but introducing areas with a thickness of 5 mm can result in differential shrinkage.
- Cavities and Undercuts: Complex parts with multiple cavities or undercuts can lead to uneven cooling, which directly affects the shrinkage rate. For example, a part with three cavities might require more precise control than a single cavity part.
Injection Speed and Pressure
How fast the molten plastic is injected and the pressure applied can alter the shrinkage rate.
- Speed: An injection speed of 100 mm/s might be optimal for a particular material, ensuring the mold fills efficiently. However, increasing it to 150 mm/s could lead to potential defects or altered shrinkage.
- Pressure: Maintaining a constant pressure of 1500 bar might lead to uniform shrinkage. But if this pressure drops to 1200 bar or rises to 1800 bar during the process, the final product’s quality can be compromised.
Cooling Rate and Cooling Time
The cooling dynamics are crucial in determining how much a part will shrink.
- Rate: A rapid cooling rate might solidify the plastic faster, resulting in higher shrinkage. But, slowing it down too much might not be economically efficient and can introduce other defects.
- Time: A cooling time of 20 seconds for a small part might be optimal. But for a larger, thicker part, extending this to 60 seconds could be necessary to ensure the material has solidified properly and uniformly.
Methods to Reduce Shrinkage
For manufacturers, reducing shrinkage in injection molding is crucial to ensure product quality, reduce waste, and improve efficiency. Here are several methods employed by industry experts to address this issue.
Optimizing Processing Parameters
Setting the right conditions during the molding process plays a pivotal role in controlling shrinkage.
- Temperature Settings: Keeping the barrel temperature at an optimal range, say 230°C for ABS, ensures that the plastic is at the right viscosity for molding, reducing the chances of excessive shrinkage.
- Injection Time: Determining the right injection time, for example, 3 seconds for a specific part, ensures that the mold fills uniformly, further mitigating shrinkage risks.
Adjusting Mold Temperature
The mold’s temperature can directly affect how a part shrinks.
- Consistent Temperature: Maintaining a consistent mold temperature, like 70°C for Polypropylene, can lead to more uniform cooling, reducing differential shrinkage.
- Mold Heating Systems: Employing advanced heating systems can provide more precise temperature control. For instance, using cartridge heaters can ensure the mold temperature stays within a ±1°C range.
Modifying Injection Speed
The speed at which plastic is injected into the mold can be a determining factor.
- Optimal Speed: Setting the injection speed at, say, 110 mm/s for a specific material can ensure efficient mold filling without introducing excessive stress, which might lead to increased shrinkage.
- Consistency: Using machines with precise control mechanisms ensures the speed remains consistent throughout the process, avoiding fluctuations that can affect shrinkage.
Tweaking Hold Pressure and Time
How long the molten plastic is held under pressure in the mold can influence shrinkage.
- Pressure Levels: Maintaining a hold pressure of 1400 bar might be ideal for a specific plastic, ensuring the material occupies the mold completely before cooling begins.
- Duration: Extending the hold time to 15 seconds for thicker parts can ensure they are fully packed, minimizing voids that could result in shrinkage.
Selecting Suitable Plastic Materials
Choosing the right plastic material is essential.
- Low Shrinkage Materials: Opting for materials known to have lower inherent shrinkage rates, such as PBT (Polybutylene terephthalate), can be a proactive approach to reduce shrinkage.
- Fillers: Some materials can be blended with fillers, like glass fibers, which can reduce the shrinkage rate, enhancing part stability.
Implementing Uniform Wall Thickness
Design plays a role in shrinkage.
- Uniformity: Ensuring a consistent wall thickness, for instance, 2.5 mm throughout the part, can lead to more predictable and uniform shrinkage rates.
- Avoid Sudden Transitions: Smooth transitions in design reduce stress concentrations, further minimizing differential shrinkage.
Using Mold Flow Analysis
Modern technology can assist in anticipating shrinkage.
- Simulation: Using mold flow analysis software, manufacturers can simulate how the molten plastic will fill the mold and predict potential shrinkage issues before actual production, saving both time and costs.
Role of Post-molding Processes
Once the injection molding cycle is complete, it doesn’t mean the part is ready for assembly or end use. The role of post-molding processes is vital to ensure the product’s final quality, dimensions, and performance. These steps can refine the properties of the molded product and further rectify issues like residual stresses or minimal dimensional variations.
Importance of Controlled Cooling
Controlled cooling is an integral part of the post-molding process.
- Stress Reduction: Uneven or rapid cooling can lead to residual stresses in the part, compromising its mechanical properties. By maintaining a steady cooling rate, say reducing the temperature by 5°C every 10 minutes, these stresses can be significantly minimized.
- Dimensional Stability: Controlled cooling ensures that the part shrinks uniformly. If a molded component of 150 mm in length is cooled too quickly on one side, it may result in warpage or a final length that’s off by 1 or 2 mm.
- Surface Finish: A consistent cooling process can improve the surface finish of the product. Rapid cooling might result in a glossy surface, whereas a slower rate might produce a matte finish, depending on the material used.
Benefits of Annealing and Post-cure Treatments
Post-molding treatments like annealing and post-cure can further enhance the quality of the product.
- Annealing: This process involves heating a part to just below its melting point and then slowly cooling it. For a material like Polycarbonate, this might involve maintaining a temperature of 130°C for 30 minutes. Annealing can reduce internal stresses, enhance clarity, and improve the dimensional stability of the part.
- Post-cure Treatments: These are often used for rubber or thermosetting plastics. After molding, the part undergoes an additional curing process, which might involve heating it to 180°C for 2 hours. This step ensures that any unreacted monomers fully polymerize, which can improve the material’s mechanical properties, longevity, and resistance to environmental factors.
Advanced Techniques & Technologies
In the world of injection molding, staying ahead often means adopting the latest technologies and techniques. These advancements can lead to faster production times, reduced costs, and enhanced part quality. Let’s delve into some of these pioneering strategies.
The Role of Simulation Software
With the rise of computer technology, simulation software has become a game-changer in the injection molding industry.
- Predictive Analysis: Modern simulation tools allow manufacturers to anticipate how a specific material will flow within a mold. For example, using software like Moldflow, one can predict the flow rate of a polystyrene part with a wall thickness of 3 mm, ensuring optimal filling without voids or overpacking.
- Cost Efficiency: With accurate predictions, manufacturers can reduce the number of trial-and-error iterations, potentially saving thousands of dollars on each mold design.
- Time Management: By reducing the need for physical trials, the time taken from design to final product can be shortened by up to 20%, allowing for faster market launches.
The Use of Gas-assisted Injection Molding
Gas-assisted injection molding is a technique that utilizes pressurized nitrogen to assist in the molding process.
- Lightweight Parts: By injecting gas, parts can be produced with hollow sections, reducing material usage and resulting in lightweight components. A part that originally weighed 150 grams can be reduced to 120 grams using this method.
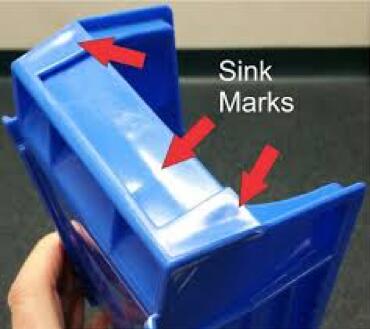
- Reduction in Sink Marks: The gas evenly distributes the pressure within the mold, reducing the chances of sink marks in thicker sections.
- Cost and Speed: This method can lead to faster cycle times, reducing production time by up to 15% and achieving a cost reduction of approximately 10% due to material savings.
The Application of Conformal Cooling Channels
Traditionally, cooling channels in molds are drilled straight, but with the advent of 3D printing, more complex cooling paths, known as conformal cooling channels, can be created.
- Efficient Cooling: These channels closely conform to the mold’s geometry, ensuring uniform cooling. For a part with a size of 200 mm x 200 mm, this can result in a reduction in cooling time by 25%.
- Improved Quality: Uniform cooling means less warpage and consistent material properties across the part, enhancing the overall part quality.
- Cost and Time: The initial investment in creating a mold with conformal channels can be 20% higher, but the savings in cycle time and increased part quality can offset the initial costs within a year.
Case Studies
While theory and best practices provide guidance in the realm of injection molding, real-world examples offer invaluable insights. Case studies spotlight the challenges faced in actual production scenarios and the strategies employed to overcome them.
Real-world Examples of Reducing Shrinkage
1. Automotive Dashboard Component Production
- Scenario: A leading car manufacturer noticed that the dashboard components produced had a consistent shrinkage issue, resulting in assembly misfits.
- Action Taken: They decided to optimize the cooling rate after discovering, through Moldflow analysis, that uneven cooling was the main culprit. They also adjusted the mold temperature to ensure more consistent cooling.
- Outcome: With these changes, the shrinkage reduced from an average of 2.5% to just 1%, ensuring a perfect fit during assembly. Moreover, they saw a decrease in the rejection rate by 30%, leading to significant cost savings.
2. Production of Transparent Beverage Bottles
- Scenario: A beverage company found that their transparent PET bottles had visible shrinkage marks, impacting the product’s aesthetic appeal.
- Action Taken: The company chose a more consistent grade of PET material and modified the injection speed to ensure the material filled the mold more uniformly.
- Outcome: Not only did the shrinkage marks disappear, but the company also reported an improvement in bottle clarity and a 20% increase in production speed due to faster and consistent material filling.
Lessons Learned from Industry Practices
1. Importance of Continuous Monitoring
- Lesson: Regularly monitoring and analyzing the parts produced can detect issues early. The car manufacturer could address the shrinkage problem promptly because of their stringent quality checks.
2. Collaborative Approach to Problem Solving
- Lesson: The beverage company collaborated with material suppliers and machine operators to understand and solve the shrinkage issue. Such a holistic approach ensures that solutions are comprehensive and effective.
3. Leveraging Technology
- Lesson: Both companies used advanced simulation software to diagnose the root causes of shrinkage. This emphasizes the importance of staying updated with the latest technologies and leveraging them for problem-solving.