To prevent stress marking in injection moulding, optimize mould temperature, material selection, and process parameters.
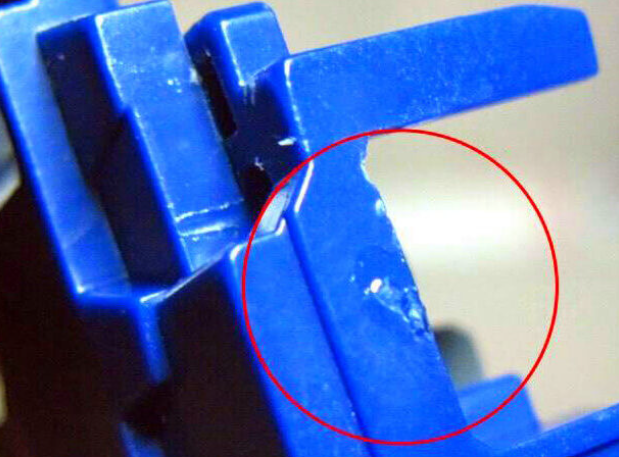
Understanding the Causes of Stress Marking
Stress marking in injection moulding often indicates underlying issues in the process, material, or mould design. It’s crucial to understand these causes to mitigate them effectively.
Material Selection and its Influence
Material choice significantly impacts the appearance and quality of the final product. Certain plastics, like polystyrene and acrylics, are more prone to stress marking due to their inherent properties. Selecting the right material involves balancing factors like strength, flexibility, and visual requirements. For example, high-density polyethylene (HDPE) offers good chemical resistance and toughness but may not provide the best aesthetics for consumer-facing products.
Material Quality: High-quality materials with consistent properties can reduce the likelihood of stress markings. Variations in material composition can lead to inconsistent melting and flow behavior, influencing the final product’s appearance.
Additives and Fillers: The use of additives and fillers can either mitigate or exacerbate stress markings. For instance, adding glass fibers can enhance the strength and rigidity of the product but can also increase the risk of stress marks due to altered flow characteristics.
Injection Moulding Process Parameters
Injection Speed and Pressure: A high injection speed or pressure can cause stress concentrations at certain points, leading to markings. Optimizing these parameters often involves trial and error to achieve a balance. A moderate injection speed of about 50-100 mm/s is generally a good starting point, though the optimal speed varies depending on the material and part design.
Mould Temperature: Mould temperature plays a critical role in how the material cools and solidifies. A too low mould temperature may cause premature cooling and uneven shrinkage, while too high may lead to longer cycle times and increased costs. Maintaining a mould temperature within 30-80°C can often provide good results, though this range can vary based on the plastic used.
Cooling Time: Adequate cooling time ensures the material solidifies properly, reducing stress. The cooling time should not be too short, as it can cause stress marks and warping. Typically, a cooling time of about 10-30 seconds is required, but it may be longer for thicker parts.
Mould Design Factors
Gate Design: The gate’s size, location, and type significantly influence the material flow and pressure within the mould. Suboptimal gate design can lead to stress concentration. For example, a gate that’s too small may restrict flow, causing high shear rates and stress marks.
Wall Thickness: Uniform wall thickness promotes even cooling and material flow. Variations in wall thickness can cause differential cooling and shrinkage, leading to stress marks. Ideally, maintaining a consistent wall thickness of 2-4 mm helps minimize these issues, though this can depend on the part size and geometry.
Ejection System: An inadequate ejection system can apply uneven force on the part during ejection, leading to stress marks. Ensuring smooth, even ejection, possibly with multiple ejection points, can help reduce these marks.
Material Considerations
Choosing the right material for injection moulding is a critical decision impacting the quality, appearance, cost, and performance of the final product.
Choosing the Right Type of Plastic
Different plastics offer distinct advantages and challenges in injection moulding. For example, ABS (Acrylonitrile Butadiene Styrene) provides good toughness and impact resistance, making it suitable for robust, consumer products. On the other hand, Polycarbonate offers excellent clarity and strength but can be prone to stress cracking and requires precise control of processing conditions.
Cost-Effectiveness: Materials like Polypropylene (PP) are popular due to their low cost (typically around $1-$2 per pound) and versatility but might not provide the best performance in high-temperature or high-stress applications.
Performance Under Conditions: High-performance materials like PEEK (Polyether Ether Ketone), though expensive (often exceeding $50 per pound), offer outstanding heat resistance and strength, suitable for aerospace and medical applications.
Aesthetic Considerations: Some materials, such as PMMA (Polymethyl Methacrylate), offer excellent transparency and are ideal for applications like automotive lights or lenses.
Importance of Drying Moisture-Sensitive Resins
Certain resins like Polycarbonate, Nylon (Polyamide), and PET (Polyethylene Terephthalate) are moisture sensitive and need thorough drying before processing. Inadequate drying leads to hydrolytic degradation, compromising the material’s mechanical properties and surface quality.
Drying Parameters: For example, Nylon typically requires drying at 80°C for 6-12 hours before moulding. Manufacturers must meticulously follow these specifications to ensure optimal quality and performance.
Effect of Filler Content on Stress Marking
Fillers like glass fibers, talc, or minerals are often added to plastics to enhance certain properties like strength, rigidity, or thermal resistance.
Improvement in Properties: Glass-fiber-reinforced materials significantly increase tensile strength and flexural modulus. For instance, a 30% glass-filled Nylon can exhibit a tensile strength increase up to 200 MPa, compared to 80 MPa for unfilled Nylon.
Impact on Stress Marking: While fillers can improve performance, they can also affect the moulding process. High filler content increases the material’s viscosity, requiring adjustments in processing parameters like higher injection pressures or temperatures. Additionally, uneven distribution of fillers can lead to stress concentrations and subsequent marking.
Optimizing Processing Parameters
Optimizing processing parameters in injection moulding is crucial for achieving high-quality products with minimal defects. Adjustments in mould temperature, injection speed, packing pressure, and holding pressure directly affect the aesthetics, strength, and dimensional accuracy of the moulded parts.
Importance of Mould Temperature Control
Controlling the temperature of the mould is vital for the quality of the final product.
Effects on Material Flow and Cooling: A mould temperature that’s too low can lead to premature material solidification, affecting the flow and filling of the mould. This inadequacy can result in short shots or poor surface finish. On the other hand, a too high temperature can lead to longer cooling times, impacting cycle time and productivity. It can also cause issues like warping or sink marks.
Optimal Temperature Range: Each material has an optimal mould temperature range. For example, ABS typically requires a mould temperature between 40°C to 80°C for the best results. This range ensures adequate flow and cooling, balancing cycle time and product quality.
Optimizing Injection Speed
The speed at which the molten plastic injects into the mould significantly influences the final product’s quality.
Balancing Speed and Quality: A faster injection speed can fill the mould quickly but might cause shear stress, leading to warping or stress marks. Conversely, a slower speed might result in a more uniform filling but can increase the risk of sink marks and voids due to premature cooling.
Typical Speeds: For instance, medium-viscosity plastics like polystyrene might require an injection speed around 50-150 mm/s, depending on the part’s geometry and complexity.
Importance of Packing Pressure and Time
Packing pressure and time determine the density and dimensional accuracy of the moulded part.
Minimizing Voids and Sink Marks: Proper packing pressure helps compensate for material shrinkage as the plastic cools and solidifies. Insufficient packing pressure can lead to voids or sink marks, especially in thicker sections of the part.
Optimal Pressure and Time: Optimal packing conditions depend on the material and part design. For example, a packing pressure of 50-100 MPa with a packing time of 2-10 seconds is often effective for many thermoplastics.
Role of Holding Pressure
Holding pressure is the pressure maintained inside the mould after the mould fills completely.
Ensuring Dimensional Stability: Applying holding pressure until the gate solidifies prevents material backflow, ensuring the part maintains its shape and dimensional toleracies.
Setting the Right Pressure: This pressure is typically lower than the injection pressure. For example, maintaining a holding pressure at about 40-80% of the injection pressure is effective for many applications. Adjustments depend on the observations of the moulded part’s quality, where warping or dimensional inconsistencies might necessitate fine-tuning.
Mould Design and Geometry
The design and geometry of an injection mould have a profound impact on the quality and characteristics of the moulded part. Critical aspects like gate location and size, wall thickness, and venting play pivotal roles in ensuring the efficiency and quality of the injection moulding process.
Influence of Gate Location and Size
The gate in an injection mould is where the molten plastic enters the cavity. Its location and size are crucial for the overall quality of the part.
Determining Material Flow and Cooling: The gate location influences the flow of the plastic and how it fills the mould. Ideally, it should be at the thickest part of the mould to ensure uniform filling and cooling. Poor gate location can lead to air traps, incomplete filling, and stress concentrations.
Size Considerations: The size of the gate impacts the injection pressure required and the speed of filling. A larger gate size can reduce the pressure required but might result in a larger witness mark on the part. Conversely, a smaller gate can lead to higher shear rates and potential material degradation.
Example: For a small, simple part, a gate width of 0.5-1.5 mm might be sufficient, while larger, more complex parts may require gate widths of up to 2-3 mm or more.
Designing for Uniform Wall Thickness
Uniform wall thickness in a moulded part is critical for minimizing defects like warping, sink marks, and stress concentration.
Ensuring Even Cooling and Material Flow: Parts with uniform wall thickness cool at the same rate, reducing the likelihood of internal stresses and dimensional inconsistencies.
Thickness Recommendations: While the optimal wall thickness varies depending on the material and part size, a general guideline is to maintain a uniform wall thickness between 1.2 mm and 3.0 mm for most common plastics.
Importance of Proper Venting
Venting in a mould is essential for allowing air and gases to escape as the molten plastic fills the cavity.
Preventing Defects: Inadequate venting can cause air traps and burn marks, affecting the surface finish and structural integrity of the part. It also leads to higher internal pressures in the mould, requiring higher clamping forces and potentially damaging the mould.
Vent Design: Vents are typically very thin (around 0.03 mm to 0.05 mm deep) and are strategically placed at the ends of the flow path or other locations where air is likely to be trapped. It’s crucial to balance the size and placement of vents to ensure adequate escape of air without causing material leakage.
Post-Moulding Techniques
After moulding, certain techniques can further enhance the quality, dimensional stability, and mechanical properties of the injection moulded parts. These post-moulding techniques, like annealing and effective cooling, play a crucial role in ensuring the parts meet the desired specifications and performance standards.
Annealing to Reduce Stresses
Annealing is a heat treatment process used to reduce internal stresses and improve the dimensional stability of plastic parts.
Process Details: This process involves heating the part to a specific temperature below its melting point, holding it at this temperature for a certain period, and then gradually cooling it down. This controlled process allows the molecular chains within the plastic to relax and realign, reducing internal stresses.
Temperature and Time Guidelines: The annealing temperature and time vary depending on the material. For instance, for a material like Polycarbonate, annealing might take place at around 120°C to 130°C for 1 to 4 hours. This process not only helps in reducing the stress but also enhances the material’s toughness and heat resistance.
Effective Cooling Techniques
Rapid and uniform cooling of injection moulded parts is essential to maintain their shape, size, and mechanical properties.
Cooling Systems in Moulds: Most injection moulds use channels through which a cooling medium (usually water) flows. This medium removes the heat from the mould and the part, allowing for faster cycle times and reduced warpage or dimensional deviations.
Optimizing Cooling Time and Temperature: The cooling time can significantly impact the overall cycle time and efficiency of the injection moulding process. For example, a medium-sized part in a material like ABS might require a cooling time of approximately 20-60 seconds. The cooling medium’s temperature is typically around 8°C to 16°C, though this can vary based on the part’s design and material.
Uniform Cooling: It’s critical to design the cooling system to ensure uniform cooling of the part. Non-uniform cooling can lead to warpage and residual stresses. Simulation tools like Computational Fluid Dynamics (CFD) can help predict and optimize the cooling efficiency, thereby enhancing the part quality and moulding process’s efficiency.